


Youtube video: https://youtu.be/7HBbuQIcKqc
Couple of years ago, I had a project in mind that involved 10 toggle switches that needed to to be connected to the Arduino as the brain of it. So, seeing that I need 10 different pins on the Arduino, I knew that I could devise something up, so that it just uses 1 to 3 pins on the Arduino. My idea is to create an adapter that will convert the toggle switch into a momentary one. And this is exactly what I've created and something even better.


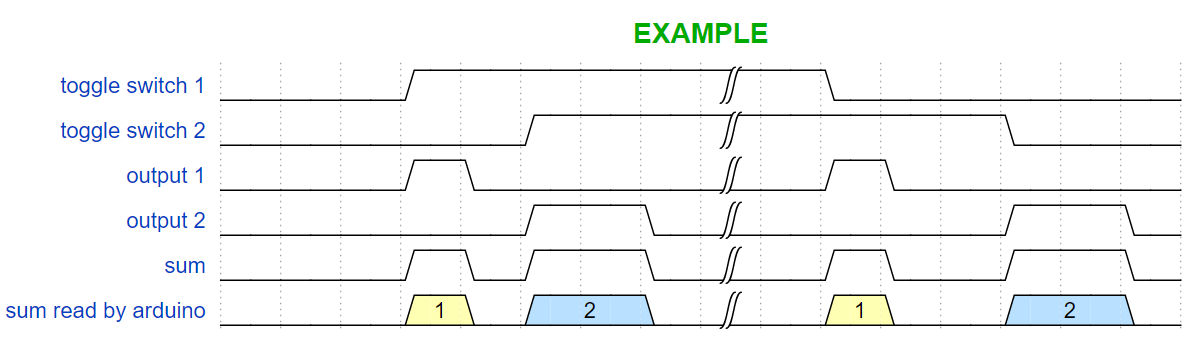
Seeing the waveform, you can notice that we need two monostable circuits, one on the rising edge and one on the falling edge to generate two pulses, each when the switch changes position (from OFF to ON or from ON to OFF). So, I constructed this beautiful four transistor schematic that does the exact same thing. Notice that the schematic only consists of transistors, there are no ICs.

NOTICE: This schematic is the correct one, I have removed a resistor from the schematic that I showed on YouTube!
Up there is the toggle switch as an input device and down there is the LED as an indicator. You could directly connect it to a pin on the Arduino. You would need to build a PCB for every switch. Always have in mind the type of the switch (on this schematic, it's the DPST switch, but you could use any other type of toggle switches, as long as you supply opposite potentials on both the bases of the transistors). The length of the pulse is adjusted according the capacitors (on the schematic 47uF). This brings the possibility of connecting as many boards of these as you like in parallel to just one of the pins of the Arduino.
Here's an example waveform with two different toggle switches and how it is possible that the Arduino can detect which one is turned on/off.
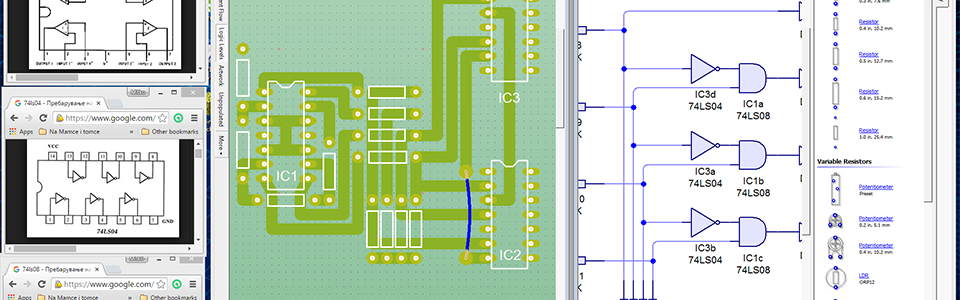
Here's the PCB for it!

Because this is done only using transistors, it's very reliable and fast enough, but it might not be so precise in the timing (It's good enough for the arduino, btw). But if you want to have something that is very precise in the timing, you could use this NE555 Schematic that I devised too.

In most cases you won't need it and it's going to cost you way more.
The PCB that I showed on YouTube is not complete, I needed to put few more pull-down resistors in place, so don't go off and copy it from there. I suggest building your own PCB from this schematic. Maybe sometime in the future I'll update the PCB and upload it here.
I have build both of the schematics on PCBs and they work just fine.
If you have any questions feel free to post them in the comments.


